
|

|
|
General FlexKrete Application Instructions
Additional detailed instructions for all applications are located within this
Resources Menu Bar.
For a printer friendly version of the written instructions listed below, please access the PDF Library.
A Simple Process
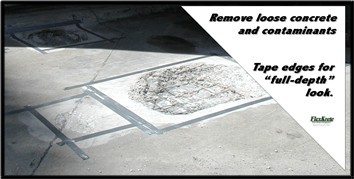

Clean and Prepare the Surface
Remove all dirt and loose debris, paint, and other contaminants.
For best results, produce a clean, dry, rough surface.
Tape the Area
For straight lines and a professional "full-depth-repair look", you can
symmetrically tape around the repair area. If the area is going to be exposed to extreme traffic, you can
add additional strength to the thin edge of the repair by putting in a 1/4" to 1/2" cut
around the perimeter, then tape outside the cut. Another OPTION is
to NOT tape the area and instead fill the void flush to grade.
Mix Before Using
Remove the lid and power mix until all settlement is dispersed.
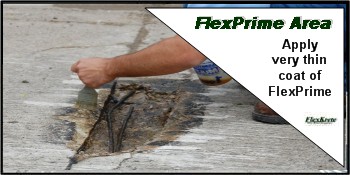
Apply FlexPrime
Mix equal parts of A and B, then brush, spray or roll A VERY THIN COAT onto the entire surface. Do not leave any puddles or ridges.
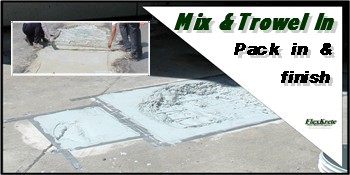
Mix and Trowel Into Place
Measure the amount of FlexKrete needed, and catalyze the FlexKrete as in step 4. Once catalyzed, power mix in about 3.5 parts of clean dry medium grade industrial sand until thoroughly blended (1-2 minutes). Pour the FlexKrete slurry onto the repair area and firmly trowel into place. Pull tape, optionally sprinkle with sand and allow cure.
Additional Tips
NO WATER ALLOWED: Use FlexPrime when repairing damp surfaces.
RETAIN EXPANSION JOINTS: Where the repair borders joints, cracks, or
obvious points of movement, always retain the joint or crack to allow the
inevitable movement. To maintain the joint, use a spacer board or simply
saw-cut through the FlexKrete. Finish by filling the joint with sealant.
ALWAYS CATALYZE: Always catalyze the FlexKrete BEFORE adding the sand.
CLEAN TOOLS: Use a clean, shiny, stainless steel trowel works best. You
can keep your tools clean by using a lidded bucket with a couple inches of
acetone in the bottom. An acetone wet rag or paintbrush can also be useful for keeping your trowel clean
for final finish strokes.
DO NOT: Put acetone directly on the repair.
FOR CONSISTENT COLOR: measure each batch the same.
VERTICAL & OVERHEAD REPAIRS: Prepare and prime as described above. Mix 2
parts fumed silica and 2 parts sand into 1 part of catalyzed FlexKrete.
Glove and trowel into place. Please refer to the Detailed V&O page for
more details.
BROADCAST SYSTEM: Prepare area to be free of all contaminants, and ensuring a
clean dry, rough substrate. Roll out the catalyzed FlexKrete at a rate of
60 to 100 square feet per gallon. Back-roll to ensure no puddles or
ridges. IMMEDIATELY broadcast onto the wet surface, the aggregate of your
choice. (i.e. colored quarts, aluminum oxide, black beauty, industrial
sand) Broadcast evenly to refusal until there are no spots showing.
After material hardens (about an hour) remove all loose aggregate with a stiff
bristle broom and leaf blower or shop vacuum. Seal with FlexSealer 1000,
and return to traffic after sealer has hardened. Please refer to the Detailed Non-Skid page for more details.
Contact us for more info
On this page we have taught you how to repair a concrete driveway, how you repair uneven concrete, how to repair a concrete slab, and how to repair a small sections of a concrete driveway.
With FlexKrete, in some applications we showed you how to repair cracks in concrete, how to repair a cracked concrete floor and concrete slab expansion joints. With FlexKrete it is easy to repair and resurface an old concrete patio, or to repair chipped concrete, and even how to repair a concrete basement floor and heaving floors in concrete basement.
With this FlexKrete process you can do exterior concrete repairs on broken concrete sidewalks, and this process works perfectly for how to repair spalled concrete.
|
|
|
|
|